Demand consists of 7 categories: Food, Tools, Meat, Drink, Spices, Goods, and Security. Each of these categories has either one or more associated shops that are unlocked after either reaching a certain level or completing specific quest lines. Players can access the demand window by either clicking on the population icon in the lower right of the screen or by clicking the on the demand specific icon in the upper left of the window where you choose goods from a shop.
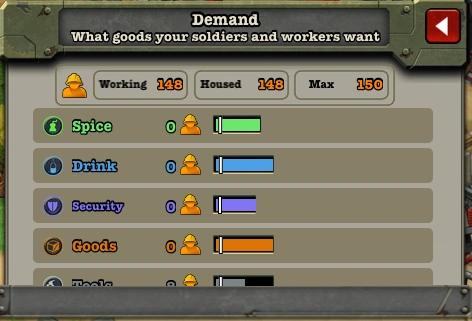
The numbers on the left show how many workers the player has devoted to each Demand category (how many people are at work in Farms, Fields, Raptor Ranches, et cetera). The colored bar to the right shows a vague representation of how much Demand there is for each category in your Outpost.
How the Demand Bar Works[]
The colored bar for each category starts filling from the left to the right (see table below for rates). Each time the player orders a good from a shop the demand bar decreases based on the total XP reward of that job. You will also notice a white line close to the left end of the bar. This white line represents the minimum amount of demand necessary to receive full gold and XP benefits from each good in your shops for that specific category. Each category takes 72 minutes to refill to the white line after being fully depleted.
It is important to note that the gold and XP rewards do NOT increase the higher the demand bar fills. All that matters is that the demand bar is at or above the white line to receive the full rewards.
Below is the complete demand table. At each level, it shows the hourly demand recovery rate and the maximum demand for each category. The hourly rate is currently 1/24 of the maximum for all categories, so that demand will refill completely in one day.
Demand Recovery Rates and Maximum Demand
Lvl
Food
Tools
Spice
Meat
Drink
Goods
Security
Rcvr
Max
Rcvr
Max
Rcvr
Max
Rcvr
Max
Rcvr
Max
Rcvr
Max
Rcvr
Max
1
41
1000
2
83
2000
3
125
3000
4
166
4000
5
208
5000
6
208
5000
62
1500
7
208
5000
62
1500
58
1400
8
208
5000
62
1500
55
1333
58
1400
9
214
5143
62
1500
55
1333
58
1400
10
260
6250
62
1500
55
1333
58
1400
11
260
6250
62
1500
55
1333
91
2200
45
1100
12
272
6545
62
1500
55
1333
91
2200
45
1100
13
272
6545
62
1500
55
1333
125
3000
45
1100
41
1000
14
272
6545
62
1500
77
1867
125
3000
45
1100
41
1000
15
173
6563
78
1875
78
1875
125
3000
45
1100
41
1000
16
296
7111
78
1875
78
1875
148
3556
45
1100
41
1000
17
298
7158
78
1875
78
1875
149
3579
74
1789
41
1000
18
321
7714
78
1875
78
1875
149
3579
74
1789
35
857
41
1000
19
321
7714
78
1875
78
1875
164
3958
74
1789
65
1583
65
1583
20
333
8000
78
1875
78
1875
166
4000
74
1789
66
1600
66
1600
21
350
8400
78
1875
78
1875
175
4200
74
1789
70
1680
70
1680
22
350
8400
94
2276
78
1875
189
4552
74
1789
94
2276
70
1680
23
363
8724
99
2379
78
1875
198
4759
74
1789
99
2379
70
1680
24
366
8800
100
2400
78
1875
200
4800
100
2400
100
2400
70
1680
25
378
9091
100
2400
78
1875
220
5303
100
2400
126
3030
70
1680
26
382
9176
100
2400
78
1875
223
5353
127
3059
127
3059
70
1680
27
397
9529
100
2400
78
1875
231
5559
132
3176
132
3176
70
1680
28
397
9529
100
2400
78
1875
259
6222
132
3176
162
3889
70
1680
29
397
9529
100
2400
78
1875
261
6270
132
3176
163
3919
97
2351
30
405
9730
101
2432
78
1875
270
6486
135
3243
168
4054
101
2432
31
407
9789
135
3263
78
1875
271
6526
135
3263
169
4079
101
2447
32
410
9846
136
3282
78
1875
273
6564
136
3282
205
4923
102
2462
33
423
10154
141
3385
78
1875
282
6769
141
3385
211
5077
105
2538
34
435
10462
145
3487
78
1875
290
6974
145
3487
217
5231
108
2615
35
448
10769
149
3590
78
1875
299
7179
149
3590
224
5385
112
2692
36
448
10769
149
3590
109
2634
299
7179
149
3590
224
5385
146
3512
37
451
10829
150
3610
112
2707
300
7220
150
3610
225
5414
150
3610
38
452
10857
150
3619
113
2714
301
7238
188
4524
226
5429
150
3619
39
491
11791
151
3628
113
2721
302
7256
188
4535
226
5442
151
3628
40
492
11818
189
4545
113
2727
303
7273
189
4545
227
5455
151
3636
41
504
12114
194
4659
116
2795
310
7455
194
4659
2323
5591
155
3727
42
505
12133
194
4667
116
2800
350
8400
194
4667
233
5600
155
3733
43
517
12422
199
4778
119
2867
358
8600
199
4778
238
5733
159
3822
44
518
12435
199
4783
159
3826
358
8609
199
4783
239
5739
159
3826
45
529
12717
203
4891
163
3913
366
8804
203
4891
244
5870
163
3913
46
535
12847
206
4949
184
4426
371
8908
206
4949
247
5939
164
3959
47
542
13012
209
5016
202
4855
376
9030
209
5016
250
6021
167
4013
48
549
13176
211
5084
220
5285
381
9152
211
5084
254
6102
169
4068
49
555
13340
214
5152
238
5715
386
9274
214
5152
257
6184
171
4122
50
562
13504
217
5219
256
6145
391
9396
217
5219
261
6265
174
4177
55
597
14346
231
5558
345
8294
416
10007
231
5558
278
6673
185
4449
60
612
14707
237
5704
384
9225
427
10271
237
5704
285
6850
190
4566
65
631
15158
245
5887
432
10385
441
10601
245
5887
294
7071
196
4713
70
650
15604
252
6068
480
11532
455
10927
252
6068
303
7288
202
4858
Notes
Updated for 2.4 patch. Edit Values directly in DemandRateBox template
There's also a hidden demand category for Mission jobs. It has a fixed cap of 50,000.
Blue Arrow Goods[]
A green arrow next to a job represents that demand is at least at or above the white line and you are receiving full gold and XP benefits if you start the job. However, you will notice that usually there is one good that has a blue arrow. This represents an item that is in higher demand, which just means that it is receiving an extra bonus to both gold and XP for a limited period of time.
The time that an item keeps this extra bonus can vary between a minimum of 4 hours and a maximum of 30 hours. The extra bonus can vary between 50% and 150% to both gold and XP.
It is usually recommended to run the job that has the blue arrow, but there are instances in which that may not be correct. See the strategy section for more information on this.
Strategy[]
This section may contain information that is out of date.
This strategy section is aimed for players trying to maximize their XP output. To do this requires multiple check-ins per day as it is important to stagger your production jobs within each demand category.
Understanding How to Use Demand Bar[]
Two of the most important things to understand are that the demand bar cannot go negative and that it is NOT a bad thing if you get the message that demand has been met. In fact if you are managing demand properly, you should get that message nearly every single time you start a job.
It’s easiest to explain with an example. These are made up numbers to simplify the example. Let’s say a full demand bar has a value of 100, the recovery rate is 10 demand/hour, and the white bar is placed at 10, meaning demand has to be at least 10 to get the full gold and xp. Now let’s say that the 24-hour job uses up 95 of the demand. So if you have a full demand bar it goes from 100 to 5 and demand is met because it is below 10. You will receive the demand has been met message, but will still receive the full gold and XP rewards for the job.
This is where strategy comes into play. We already established that demand cannot be negative. Thus, any job which would reduce demand to less than zero reduces it to zero instead. So if you do the 24-hour job which in my example is worth 95 demand when the demand bar is at 10 instead of at 100 you get the full benefit but only had to let demand rise to 10 instead of waiting for it to rise to 100. So in this example I could run ten 24-hour jobs in the same time it takes a person who is letting demand completely fill to run one job.
Thus, the best strategy is not to sync up all of your shops, but rather to stagger them so that you start a new job each time the white bar reaches the white line. In the actual game that time is approximately every 75 minutes.
The higher the demand bar is does not mean you will get higher xp or higher gold. All that matters is that the demand bar is above the minimum threshold. If you let it rise above that you are actually wasting some amount of demand because you could have started a job sooner than you did and thus be able to start the jobs after that sooner. If you are doing this correctly it should look like your demand is completely empty for all categories all the time.
With the exception of when you wake in the morning, if demand is significantly above the white line each time you log in, either you could have more shops in that category, or you could check in more often to increase your XP output, or both.
Placement[]
Arranging buildings so they can be boosted is key to rapid XP gains. A review of high-level players layout reveals that arranging all like-items together along roads with boosting decorations in between can increase rewards by 30-60%. Place your best producers in the center of decorations and poor one on the perimeter.
Tips and Tricks[]
If you have two or more shops in the same category available for use and demand has just met the white line. Any job you start will likely completely deplete demand. Instead of letting the other shops sit idle, start short jobs in them, so they are available again by the time demand recovers and you check in again. Don’t let them just sit idle, unless you need the population elsewhere.
If demand is a little above the white and you have two shops open and a longer job is a blue arrow job, Don’t start that job first. Run a short job in the first shop, so that demand does not dip below the white line, and then run the long job. If you do this in reverse your short job will be run with depleted demand. This takes some practice to know if you have enough demand built up that the first job will not bring demand too low and is usually a strategy that is useful in the morning.
Better storage is a hidden bonus to XP production. This is because it frees up workers to build more shops to produce more XP. This is what buying storage is the 'best' way to spend nanos.
Assisting Shops instead of resources or military buildings will help jobs finish quicker and help you earn XP quicker. This is a key part of the strategy used by players who are able to prestige 4+ times per day. They find other friends who also will assist only shops and then each player benefits from the increased XP.
Pick the highest value based upon the time you'll return to the game. For example, before going to bed pick the highest value item that takes 8 (or 12?) hours or less.
If you have many Shops/Ranches/Farms ready to start all at the same time here's the best process: first collect all products, upgrade one item, start your quest items, review possible values of all buildings and do the math of XP/hour (e.g. At high levels 200 is good, 100 is poor), start high-value & shutdown low-down items, and finally Accept the help from Friends.